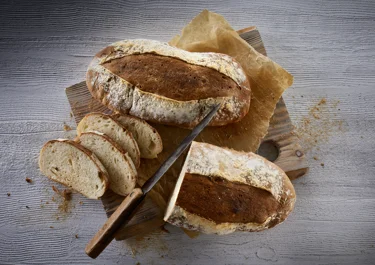
Protein bread with buttermilk

Instructions
Recommended information
Serving suggestion
Use cold butter milk for yeast fermentation
To get the best fermentation for this recipe, use cold buttermilk. This helps control yeast fermentation, allowing the dough to develop slowly and enhancing flavour. The cool temperature of the buttermilk slows down the yeast activity, giving the bread a slight tang and a beautifully complex taste as it ferments. This slow rise also contributes to a better crumb structure and an airy texture, making the final loaf deliciously satisfying.
Cool your protein bread before cutting
After your loaves come out of the oven, start the cooling process by turning the oven off and cracking the door open. Let the bread cool slowly for about 30 minutes. This step helps keep the crust from hardening and the bread from becoming dense. Next, move the loaf to a wire rack to cool further, preventing a damp, soggy bottom and keeping the crust crisp. Allow the bread to cool on the rack for at least an hour before slicing. This waiting period is essential for air to circulate and the bread to keep its shape. Slicing too early can lead to a loaf that's difficult to cut and lacks firmness.
Master dough elasticity through kneading
Aim for a shiny and elastic texture by kneading at the highest speed as suggested by the recipe. To check if the dough has enough elasticity, try the windowpane test: stretch a small piece of dough between your fingers to see if it forms a thin, see-through layer without breaking. This indicates that the gluten is well-developed, and the dough is set for the next phase. If it rips during the windowpane test, knead it for a bit longer, then test again until it's elastic enough.
FAQ: Questions about protein bread
Making fresh protein bread is simple with this recipe. Browse our FAQs for answers to your questions about yeast fermentation, achieving the perfect texture and storage tips.
Nutritional values
Nutritional value, per
2456 Kcal
| Fibre | 24.3 gram fibers |
| Protein | 67.9 |
| Carbohydrates | 506.5 |
| Fat | 13.8 gram |
Ingredients
Day 1: pre-dough
Dry yeast | 10 g |
|---|---|
Buttermilk | 200 ml |
Wheat flour or strong white bread flour | 125 g |
Day 2: dough
Water | 300 ml |
|---|---|
Sugar | 1 tsp |
Coarse salt | 2 tsp |
Wheat flour or strong white bread flour | 550 g |
Water (to brush) |
To garnish
Sieved flour |
|---|
What makes the ingredients in this recipe special?
The ingredients in this recipe come together to create a bread that’s both flavourful and satisfying. Buttermilk adds a subtle tang and keeps the crumb tender, while also helping with a slow rise. The yeast is key for creating a light, airy texture by fermenting and releasing gas. A bit of sugar helps feed the yeast and enhances the golden crust, while salt balances the flavours and strengthens the dough’s structure. Each ingredient plays an essential role in creating a well-rounded, delicious loaf with great texture and taste.
If you're craving a bread with a rich, nutty flavour and a satisfyingly chewy texture, try our high-protein bread. Packed with seeds, whole grains and a touch of yogurt for softness, it’s a delicious addition to any breakfast table.
Get creative with bread shapes and scores
With this recipe, you have the freedom to get creative with shapes and scoring designs, adding a personal touch to every loaf. Try shaping the dough into a classic round boule, a long baguette or even a braided loaf for an impressive look.
Scoring the dough before baking – using a sharp knife or a bread lame – allows you to create beautiful patterns, like simple slashes, intricate leaves or geometric designs. Not only does scoring add visual appeal, but it also helps control how the bread expands in the oven, giving it a rustic, bakery-style look.
Keep in mind that different shapes can alter the baking time; smaller or thinner shapes like baguettes will bake faster, while larger, denser shapes may need more time to fully cook through.
Bring back freshness with toasting
If your protein bread starts to lose its initial softness and freshness, don’t worry – toasting can work wonders. By lightly toasting your bread, you’ll revive its golden, crunchy crust and bring out the rich, hearty flavours. Simply slice your bread to the desired thickness, and toast until lightly crisped and warm. This small step not only reinvigorates the bread’s texture but also enhances its aroma.
No mixer? No problem
Making protein bread doesn’t require any fancy equipment. In fact, you can create a beautifully textured loaf using only your hands and a sturdy mixing bowl. Start by mixing the ingredients with a wooden spoon until they come together, then transfer the dough onto a clean surface and knead with your hands. Working the dough manually allows you to feel its consistency, helping you gauge when it’s ready to rest and rise. This hands-on approach not only simplifies the process but also adds a personal touch to your loaf, giving you that true artisanal experience at home.
Keep your protein bread fresh with smart storage
To keep your loaves fresh and tasty for longer, consider a few easy storage tips. Once your bread has cooled completely, wrap it in a clean tea towel or place it in a paper bag, which will help maintain its crust without trapping too much moisture. Avoid using plastic, as it can make the bread overly soft or chewy.
For longer storage, wrap the loaf well and freeze it, slicing it beforehand for easy toasting later. With these smart storage habits, you’ll extend your bread’s freshness and have delicious slices ready whenever you want them.


